May 11, 2014

It's Time to Celebrate by Mel Connell


Welcome Back Everyone. 

Wow I can not believe it is May already. This year is sure passing quickly. Might be because of all the exciting projects I have been working on lately. So My Brother-in-Laws Birthday was recently, and I created this card to give to him. We always have a strong moustache theme when it comes to him as he truly is a modern day Dapper, with a handlebar moustache, although it has recently been trimmed to a more modern version of that. 


So you will need some white card stock, some JAC paper (double sided sticky paper adhesive) some black Coredinations cardstock with a white core, Couture Creations embossing folder, Couture Creations Nesting Dies, Victorian Square to get you started. 


Cut your self a card blank from your white cardstock and a rectangle piece of your black Coredinations cardstock. Run your Cordinations cardstock through your embossing machine in your favourite Couture Creations embossing folder. Using your Couture Creations sanding block, gently rub back the embossed surface to expose the white core inside. Distress the edges of this pieces and adhere to the centre of your card blank. 


Using another piece of white card stock cut some JAC paper large enough to fit your largest of two sizes of your nested dies. Stick this directly to the cardstock. Run through your machine and cut both sizes of nested shapes at the same time. One will be cut from just cardstock, the other will have the sticky JAC paper on one side. 


Peel back the protective paper of the JAC paper piece and stick he smaller nested shape right in the middle. Sprinkle the edges (sticky JAC edges) with glitter and press down with your finger to make sure you get a good adhesion.


Stamp a greeting onto the centre of the nested shapes and addax embellishment as I have with this resin moustache. Mount this onto the front of your card with your High Tack Foam tape 


As a final touch add some small gems using your LED Tweezers to areas of your embossed design. 


CO721993 Gemstone, Red Lust.
CO723406 Core Card Sampler.
CO721954 LED Tweezers.
CO723060 Sanding Block.
CO721961 Foam Mounting Tape, High Tack, 12mm.
CO721985 Double Sided Tape, 6mm.
CO723048 Nesting Dies, Victorian Squares.




April 22, 2014

Vintage Couture Tag by Mel Connell


Welcome back everyone. 
Today I have an Art Tag I created using lots of the Couture Creations goodies. 
You will need either a white or manilla tag, some white cardstock, water reactive inks, brown ink, some embellishments and all  the Couture Creations goodies you can possibly put on it. 


Start by ink the entire surface of your tag. I used two colours but you can use as many as you want. Flick some water on it to active the inks and get the water stained effect. 


Using a Couture Creations finger dauber, ink with brown all around the tag to get a worn vintage look. Run your tag through your embossing machine using an embossing folder, I used the Couture Creations Sew Sew Sew embossing folder. Use your dauber and brown ink to highlight the raised embossed pattern. 


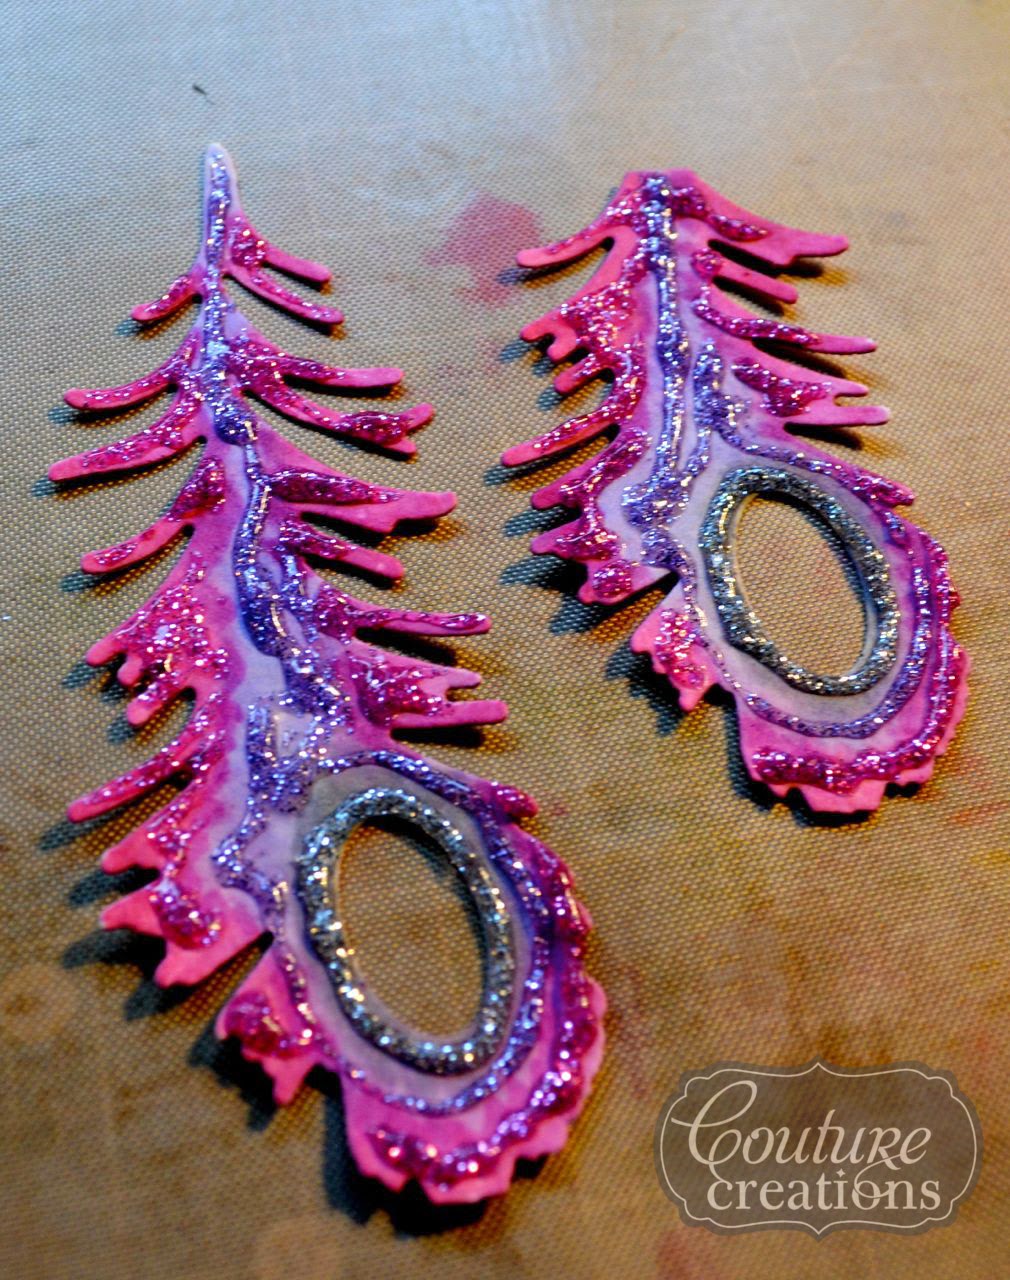
Using the Couture Creations Peacock delight die cut two feathers from white cardstock. If you don't have the Peacock delights die, any of the Leaf/branch or other feather dies from Couture Creations will work just a well. I used some water soluble markers to colour the cardstock, but again crayons, inks and ager colour pencils will work just as well for this also. I chose three colours Pink, purple and silver. One the car stock is coloured add a few squeezes of your Glitzin Glamour glitters over the top. 

Use your Couture creations embossing stylus to spread out the glitter glues and blend them into each other. Set these aside to dry. 


I cut a few Ruler prints from my Couture Creations Sew Job patterned Paper pad, and gathered some embellishments. Don't for get your glittered Peacock Delight feathers. Layer these up on your tag as desired and adhere with your Couture Creations 3D glue dots and high tack foam tape. 

As a final touch, add some highlights with your Glitzin Glamour Glitter and sprinkle around some Couture Creations Gems or Pearls. 

Thanks for stopping by to have a look at this tag project, I would love the hear if you made one of your own inspired by this. You could always show us your take on this at the Couture Creations Facebook page. We'd love to see it. 


April 02, 2014

Love by Mel Connell

Welcome to my very first blog post as part of the 2014 Couture Creations Design Team. 
Firstly I want to thank the Panel for choosing me to be apart of this adventure over the next twelve months, and i am so thrilled and excited to be working along side Kerrie and all the other ladies on the team this year. 

So when my Design Team kit arrived I was overwhelmed and delighted with my box full of goodies and had a hard time deciding where to start. So I went with what I loved first. I love a doily, and I love me some snow!


I pulled out some white card stock, my Couture Creations Doily die, a sheet of printed paper from Couture Creations Sew Jo 12x12 paper pad and got to work. 

Cut the printed paper down to 11.5 inches squared and distress the edges. Adhere this into the centre of your card stock with even edges all round. 

Cut your self 4-6 doily's out of white card stock. Use your Couture Creations embossing stylus to help pop all the little bits out of the centres. 

Squeeze out a bunch of the Crystalina Glitzin Glam and use a paint brush to paint this over the enitre surface of your die cut Doily's. 


Pop a bunch of the Couture Creations 3D Foam Mini Dots on the backs of all your Doily's.

Using my Glamour Days Classical die I cut myself one from heat shrink plastic. Don't forget to pop all the centres out and punch a hole at the top for a jump ring. Use your heat tool to shrink the plastic down to size. 


You can see that I have added a jump ring and a bead and included it in a cluster of embellishments in the bottom right corner of my layout. 


 Matt your photos and gather a small collections of embellishment together. 


I added my die cut doily's to my background paper, then added my photos over the top. To make them stand up I added two layers of the 12mm Couture Creation Foam Mounting Tape. I stuck a small Couture Creations Gem in Seaspray in the centre of each doily. 

I completed my layout by adding a small scattering of embellishments and right at the end just to finish off I stuck down some clusters of Couture Creations Pearls in Moonlight. 


I hope you like my first offing here on the Couture Creations Blog, please share if you followed along and created a layout inspired by mine. See you next time. 

Couture Creations Products used today are:

CO723244 Ornamental Lace Dies, Elegant Motif
CO723711 Glamour Days Inticutz Dies, Classical
CO723547 12x12 Double Sided Paper Pad, Sew Jo
CO721985 Double Sided Tape, 6mm
CO721984 Double Sided Tape, 12mm
CO721964 Foam Mounting Tape, 12mm
CO723781 3D Foam Mini Dots
CO721955 Pointed Non-Stick Scissors
CO721954 LED Precision Tweezers
CO721957 15x15 Self Healing Cutting Mat
CO7211986 Handheld Essentials 3 Pack
CO721971 Glitzin Glamour, Crystalina
CO721989 Gemstones, Seaspray
CO721998 Pearls, Moonlight


March 19, 2014

Blog give away winner.

Good Morning All, 
I bet you all thought I'd forgotten about the blog give away. I hadn't I just got caught up with life and haven't had the chance to announce the winner until now. 

So are you ready?? 

The winner of the little give away is Scrapjack! Yay. 

Thanks to everyone who popped by. 

Mel xxx

March 01, 2014

Follow my blog with Bloglovin

Couture Creations 2014 Design Team Announcement.

Couture Creations 2014 Design Team.

I am so thrilled to announce that I was chosen to be apart of the Couture Creations 2014 Design Team. I am so, so, so excited about this.
Go on over to the the Couture Creations blog to follow the links to all the talented ladies that have been chosen. There is a very diverse group of styles, and something for everyone.


During the Design Team try out process, i was obviously in my craft room late into the night creating things for my Auditions. I generally have at least one helper, sometime two ( my cats), but on this particular occasion, Olive decided the best place to have a little nap was right on top of the pile of finished layouts I had done.


As I have had a fabulous week this week, I wanted to share the love a little. So I have a little give away. 
It's so simple to enter. All you have to do is leave a comment. That's it, that's all it takes. Say anything. Tell me about your day, tell me about what you would make with these goodies, tell me about your pet, anything at all. I'll draw a winner on March 15th. 


Keep checking back for new work I will be putting up. I have been doing a couple of online course which I am yet to be brave enough to share here, but i might be soon. 

Mel xxx

February 23, 2014

Couture Creations Design Team Application Round 2.


So I have a step by step tutorial today for you using both Couture Creations Embossing Folders and Dies, and Core'dinations Cardstock.

The Core'dinations Cardstock and Couture Creations Embossing Folders are a match made in heaven. As the card stock has a different colour core, once it has been embossed and then sanded the pattern from the embossing shows in a soft distressed way.

If you would like to keep up to date with all that happening and for the newest releases from Couture Creations sign up for the newsletter here, and like them on Facebook here.

If you would like to know more about Core'dinations cardstock, check out their website here.

"US" Step by Step Tutorial:

By Mel Connell


You will need: 
  • Three different Couture creations Doily Dies. I have used Ivy Set Doily Dies - CO723222, Blossom Yarn - CO723114, Damaris - CO723477 and Mimi - CO723476.
  • One Couture Creations Embossing Folder. I have used Large Damask Flourish - CO723449.
  • 4 sheets of Core'dinations Cardstock. All the same colour. 
  • 2 sheets of accent cardstock. I have used Kraft but you could use black or white also. 
  • An assortment of flowers.
  • one colour of embossing power to suit your colour theme. 


1. Cut 9 squares of Core'dination Cardstock at 5" square. 


2. Fold all nine squares corner to corner to create a cross through the centre of each piece. I used my bone folder to make crisp sharp folds. Open all nine pieces back out flat. 


3. Fold all four corners into the centre point. Again use your bone folder to get sharp folds. Repeat on all nine pieces.


4. Place each folded pice inside your embossing folder and run through your machine to emboss. Emboss all nine folded pieces of cardstock. 


5. With some sand paper, sand over the embossed design. The top layer of the Core'dinations cardstock will come away and reveal the inside colour. Sand all nine pieces. Sand the side with all the folds only. The back doesn't need to be done.


6. With some craft glue add a small drop on the inside tip of each folded flap of cardstock. When gluing down, push the card away from the centre point slightly so the cardstock creates a small pillow. Hold in position for a second until the glue grips. Repeat this for all four flaps on each piece of card stock. Do all nine squares. In the third picture here I have put a black marker dot to show you the centre and how the tips are set back slightly when glued in place.


7. From one sheet of your accent cardstock cut a square 11 1/4". glue or double side tape all nine pillows into the centre of this square. You should have a small board around all four sides. 


8. Border Punch around the outside of your remaining piece of Core'dinations cardstock and adhere in the centre your pillow piece. 


9. Add some adhesive bling or gem brads to the centre of each pillow. 


10. From the second sheet of accent cardstock, cut your self three doily's and three flourishes using your Couture creations dies. 


11. Heat emboss the three flourishes. I coat each piece and heat set twice to give a thick smooth finish. 


12. Mat your photos with the accent cardstock. Adhere into place on your layout background, your photos and the three doily die cuts. 


13. Adhere into place your selection of flowers and sprays.


14. Adere your three Heat embossed flourishes onto your layout. 


15. Add your title, any smaller supplementing words and embellishments as required. 


I do hope you enjoyed my little tutorial. I'd love to hear from you if you created your own page following these steps. 

Don't forget if you would like to keep up with Couture Creations latest releases and all the gorgeous creations that are on their blog, sign up for their newsletter and like them on Facebook. Links at at the start of this post.